Advanced Animation : Exercises

10/04/2023 - 15/05/2023 / Week 02 - Week 07


Advanced Animation GCD61604
NAME: Sea Hirayama

I.D: 0347596

COURSE: Bachelor of Design in Creative Media / Taylor's Design School


●Instructions


 ●Task Progress

Students are to produce and manage a practice series individually by using relevant programs and software that enable 3D animation:

1. Bouncing Ball series:
a. Soccer ball - Normal weight
b. Bowling ball - Heavy weight
c. Ping Pong ball – Light weight
d. Squash and Stretch ball

2. Flexibility animation: Animating flexibility of shape using squash and stretch and joint appendages using straight ahead method.

3. Good Poses Study: Pose a character according to the right emotion and action.

- Week 2 

EXERCISE 1: BOUNCING BALL ANIMATION


  1. Download ball rig for the exercise:

Multiball https://drive.google.com/file/d/1wjGa1o9gyFfnVdeWpQef7xq1uwONsFkI/view?usp=sharing


  1. Explore and understand the rigs.


  1. Find image/video reference for these bouncing ball:

    1. Soccer ball - https://www.youtube.com/watch?v=01cm7H1QoJg

    2. Ping Pong - https://www.youtube.com/watch?v=gTsx5eW2eLU

    3. Bowling ball - https://www.youtube.com/watch?v=DTz_5quG_ig

    4. Beach ball - https://www.youtube.com/watch?v=s74P1ejubEA

    5. Squash and Stretch - no example

  2. Plan the ball movement by drawing it on a paper.

  3. Observe the difference of each ball's physical property (soccer, ping pong and bowling) and its weight. Analyse how does it affect:

    1. The timing and travel distance of each bounce (Contact pose to Contact pose)

    2. The overall timing that determines the number of bounces.

    3. The height of each Up pose when it bounces.

  4. Set the animation setting:

    1. Image size: 1280 x 720 (HD) or 720p

    2. Frame rate: 24fps

  1. Animate each ball base with the correct:

    1. Timing

    2. Spacing (Slow in and Slow out)

    3. Arcs

  2. Light and render the animation into an image sequence. Use *.png with alpha format.

  3. Composite and edit in Compositing software (ie. Adobe After Effects) and Editing software (ie. Adobe Premiere).

  4. Add label in the video as these:

    1. COVER PAGE
      GCD61604 - Advanced Animation
      Exercise 2
      You Name
      Matric No.

  5. Put label on each animation video respectively:

    1. Soccer Ball

    2. Ping Pong Ball

    3. Bowling Ball

    4. Beach ball

    5. Squash and Stretch Ball

  6. Output the final animation using this format:

    1. Format: HD 1280 x 720 (720p)

    2. Frame rate: 24fps

    3. Output Format: *.mov

    4. File naming: Your name_Exercise No. (Eg: KamalBahrin_Exercise2)

  7. Overall assessment is based on:

    1. Appeal

    2. Clarity

    3. Fluidity

  8. Assessment breakdown:

    1. Soccer Ball - 1%

    2. Ping Pong Ball - 1 %

    3. Bowling Ball - 1%

    4. Beach Ball - 1%

    5. Squash and Stretch - 1%

  9. Submission is on the WEEK 3 before class.


So for this week,  I've started researching and analyzing about the timing and bounce and so on before also start create in animation.

One simple movement is regular movement. A bowling ball rolling on the floor is a good example.
The characteristic of this movement is that the speed is constant. The spacing between frames is also constant.
The greater the spacing, the more the ball moves. The larger the spacing, the faster the ball moves.

Timing and spacing express the speed of movement.

When an object accelerates, the distance between pictures becomes wider.
In animation, this is called "throwout" (easy
This is called "throwout" (easy out). A ball rolling down a slope is a good example
A ball rolling down a slope is a good example of a throwout.

Throwin' in and out is "The Illusion of Life" by Frank Thomas and Ollie Johnston.
The throw in and out is one of the rules of animation
The Illusion of Life" by Frank Thomas and Ollie Johnston.
They wrote, "It is a very important discovery. They wrote, "It's an important discovery, and one that is the basis of our timing and staging. It became the basis for devising the timing and staging. They say, "It was a very important discovery and became the basis for devising timing and staging.
The "magic of animation" is one of the laws of animation described in the book "The Magic of Animation.

If there is little or no air resistance, the weight of an object
The distance traveled by an object falling will not change depending on the weight of the object. Normally, the time to see a falling object is 0.10 seconds. After visualization, the time to react and grab the object is about 0.20 to 0.25 sec. The time to react and grab the falling object is about 0.20 to 0.25 seconds. There is a margin of error in visualizing and reacting.

The spacing of the falling objects is simple.
Since odd numbers (1,3,5...) are used, the spacing ratio is 1:3:5:7... starting from the vertex position, called "The Odd Rule".

Physics measures the overall distance from the starting point... ratio 1:4:9:16... or 1 to the square, 2 to the power of 1... or 1 to the power of 2... or 1 to the power of 2... Or 1 squared, 2 squared, 3 squared...

Objects appear to stretch due to motion blur when the speed of motion increases. The effect of motion blur does not change depending on the material of the object; a soft object (such as a water yo-yo) will appear to stretch more naturally than a hard object (such as a bowling ball).

Falling objects appear to be vertically elongated by motion blur. However, in animation, the volume of an object appears to have changed if the object is only stretched vertically. Therefore, in such cases, in animation, the horizontal (left and right) side of the object is contracted to keep the volume consistent with the vertical extension.

Figure 1.1-2 the draft for animation

After I prepared the draft, I tried to create them in Blender.

 
Figure 1.3 Soccer ball

Figure 1.4 Ping pong

Figure 1.5 Bowling ball

Figure 1.6 Beach ball

Figure 1.7 First attempt animation for exercise 1


After I got the feedback and learned how to change the shape like squash and so on, I tried to edit it better than precious animation.

Figure 1.8 Soccer ball

Figure 1.9 Ping pong

Figure 2.0 Bowling ball

Figure 2.1 Beach ball

Figure 2.2 Final design, animation for exercise 1


- Week 3

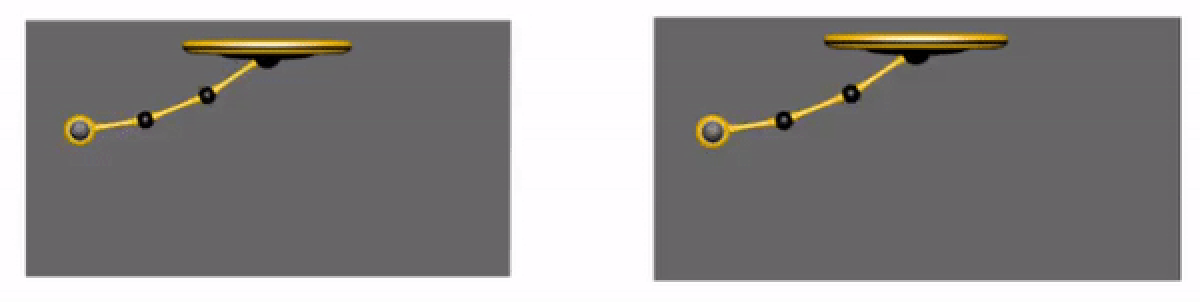
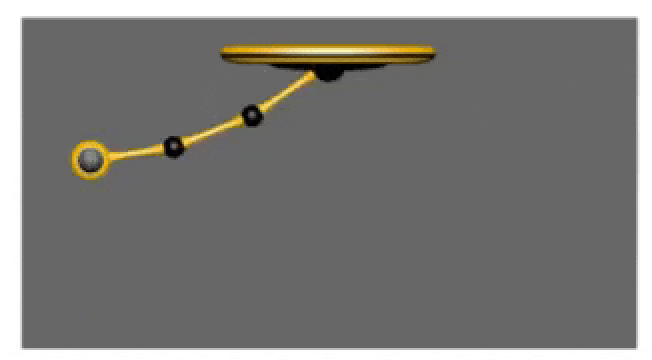
EXERCISE 2 : PENDULUM ANIMATION


  1. Download pendulum rig for the exercise:

Pendulum https://drive.google.com/file/d/1rszHRtfgKw-RxTDiL0y6qRCtiQ-7368S/view?usp=sharing


  1. Explore and understand the rigs.

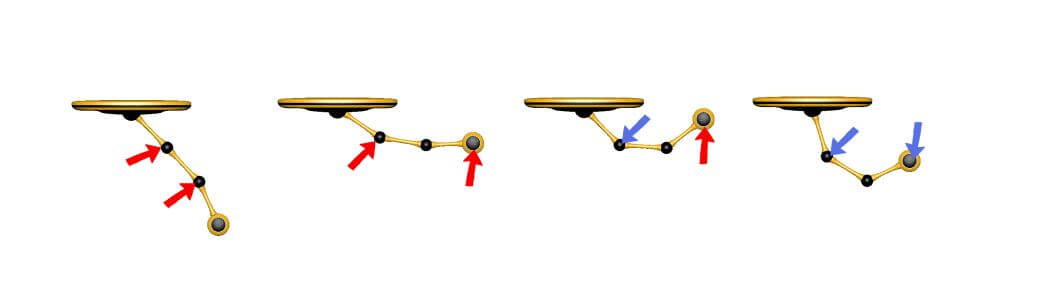
  2. Animate the pendulum main object moving from left to right on the screen and swing to show drags, overlapping and follow through.

  3. The believability is based on speed of the main action and how the tail is reacted through its flexibility attributes.

  4. Set the animation setting:

    1. Image size: 1280 x 720 (HD) or 720p

    2. Frame rate: 24fps

  1. Animate the pendulum swing with the correct:

    1. Drag

    2. Overlapping

    3. Follow Through

  2. Light and render the animation into an image sequence. Use *.png with alpha format.

  3. Composite and edit in Compositing software (ie. Adobe After Effects) and Editing software (ie. Adobe Premiere).

  4. Add label in the video as these:

    1. COVER PAGE
      GCD61604 - Advanced Animation
      Exercise 2
      You Name
      Matric No.

  5. Put label on each animation video respectively:

    1. Pendulum Swing Animation

  1. Output the final animation using this format:

    1. Format: HD 1280 x 720 (720p)

    2. Frame rate: 24fps

    3. Output Format: *.mov

    4. File naming: Your name_Exercise No. (Eg: KamalBahrin_Exercise3)

  2. Overall assessment is based on:

    1. Appeal

    2. Clarity

    3. Fluidity

    4. Flexibility

  3. Submission is on the WEEK 5 before class.


So for this exercise I create with some research for understanding how to move tha tail part.

Specific instructions for making hair, tails, pendulums, and other swinging objects

The movement of swaying is quite difficult, but it can look quite like it if you just keep in mind the points that are easy to make mistakes. In this issue, we have tried to keep only such easy-to-mistake and important points in mind.

1. In the middle of the movement The movement of the tip lags behind that of the root. This movement is called drag in animation terminology.


2. Start of movement At the start of movement, the tip tries to stay in place. The fact that the tip is still moving even though the source of the underlying motion has already stopped is called follow-through in animation terminology.


3. When the direction of movement changes
When the direction of movement changes, it is good to create a section where the direction of movement changes at the root and the tip. A shift in timing between the root and the tip is called overlap.
However, this depends on the speed of the movement and the weight of the object at the tip, so the direction will not change depending on the situation.

After I learned it with tutorial and research, I tried to make it myself.

Figure 3.1 PENDULUM 1

Figure 3.2 PENDULUM 2

Figure 3.3 PENDULUM 3

Figure 3.4 The final design, animation for exercise 2


- Week 6

EXERCISE 3: EMOTION POSE


  1. Download any of these character rigs for the exercise:


  1. Explore and understand the rigs.


  1. Find image/video reference for action poses that show these emotions.

    1. Happy

    2. Sad

    3. Angry

    4. Scared


Notes: If you are using video reference, snapshot its still image. You can capture yourself using a smartphone camera too.


  1. Observe the reference. Spot the key or storytelling pose and its dynamic.


  1. Draw from your study of the pose to show:

    1. Line of action

    2. Silhouette

    3. Weight and balance / contrapposto

    4. Avoid parallel and twinning.


  1. Pose the character’ body and facial expression to depict the action and emotion


  1. Render the final pose with simple rendering. 


  1. Put each pose in the presentation slides on each individual page with a drawing of your study on the other page.


  1. Overall evaluation will be based on:

    1. Ability to demonstrate appeal quality

    2. Ability to demonstrate the clarity in:

      1. Staging

      2. Exaggeration

      3. Secondary Action

      4. Solid Drawing


  1. Submission is on Week 07 before class.


First I got the references for each pose from Pinterest. I just wanted to think about
exaggeration that's why I picked up some references with over reaction.

Figure 4.1-3 The scared pose references

Figure 4.4-6 The sad pose references

Figure 4.7 The happy pose references

Figure 4.8-10 The angry pose references

After I selected the references for this exercise, pose, I tried to create them in 3D Blender
as well.

Figure 4.11 The screenshot of the progress with scared pose

Figure 4.12 The screenshot of the progress with scared pose

Figure 4.13 The screenshot of the progress with sad pose

Figure 4.14 The screenshot of the progress with sad pose

Figure 4.15 The screenshot of the progress with happy pose

Figure 4.16 The screenshot of the progress with happy pose

Figure 4.17 The screenshot of the progress with angry pose

Figure 4.18 The pdf for poses

Figure 4.19 The slides for final design


After I get the feedback, I tried to create this exercise 3 again with new references.


The pdf for poses


●Submissions (Final Design)

Exercise 1

Figure 5.1 Soccer ball

Figure 5.2 Ping pong

Figure 5.3 Bowling ball

Figure 5.4 Beach ball

Figure 5.5 Final design, animation for exercise 1


Exercise 2


Figure 5.6 PENDULUM 1

Figure 5.7 PENDULUM 2

Figure 5.8 PENDULUM 3

Figure 5.9 The final design, animation for exercise 2

Exercise 3

Figure 5.10 The pdf for poses


●Reflections

Experience:
Learning by doing is often the most effective way to gain mastery of a skill. By using Blender to create 3D models and animations, I was able to apply the concepts I learned in a practical way.

Observation:
In my observation, Blender is a powerful tool for creating 3D models and animations. It has a steep learning curve, but once you get the hang of it, you can create complex and detailed animations with ease. One thing I've noticed is that it can be helpful to break down the animation process into smaller steps or tasks and focus on mastering one at a time. This can help prevent overwhelm and make the learning process more manageable.

Findings:
I have gained a solid foundation in animation fundamentals through your experience with Blender. This is a valuable skillset to have, as animation is an increasingly in-demand field across industries such as film, gaming, and advertising. With own newfound knowledge, we may want to explore different types of animation, such as character animation or motion graphics. Additionally, it can be helpful to continue practicing and refining our skills to improve your proficiency in Blender and animation overall.

References:


Introduction to 3DCG Animation

I want to move characters! I want to make animation! I want to learn character animation! This book is a detailed explanation of the "basic concepts of movement" that animation beginners and new animators who want to learn character animation should keep in mind at the beginning of their studies.

It starts with basic knowledge of pendulum motion, ball bouncing, and the laws of physics, then moves on to walking and running, which are essential for animation, and then moves such as jumping jacks and pitching, which are applied to animation, as well as video production terminology. What are the key points of key poses? Why do we get into those poses? Where do I make the corrections? The book is designed to scratch the itch of beginners by addressing such questions as "What is the point of a key pose?

Another feature of this book is that it focuses on the "basic concepts of motion," so it is possible to learn character animation regardless of the type of 3DCG software used. Using original drawings and animations as examples, the book explains the 24 frames per second of a typical animated drawing as 24 frames per second in 3DCG, making it highly compatible with the Japanese animation production field. The animation explanations include exercises at key points to develop the ability to think and acquire basic skills that can be applied to a variety of movements.


Free Blender CG Animation Techniques

This is a book to learn animation from the basics.
Compatible with Blender 2.8. The book is likened to a game, and you can step up as you clear each "stage". The book is based on the concept of "having fun while animating," so it is designed to be smooth and easy to understand.
As an introduction to animation itself, the book also explains the basics of animation, such as how to make a character walk. Recommended for those who can model but do not yet understand animation.

Comments